I'm soooo excited to share this post! It's been months in the making, and it's finally done!
A few months ago, Marc and I bought a historic 1820 fixer upper house. It's got tons of potential and has an amazing rustic, farmhouse style that's inspired a whole new way of looking at interior design for me (I promise to show some pictures soon so you'll see what I mean!).
There's a main house and a basement apartment that we'll eventually have as two rentals. We're currently working to finish out the basement apartment in hopes of having it rented by August 1st. (Let us know if you have anyone interested! This place is so one-of-a-kind!)
 |
| basement kitchen counter |
When the family opted to take the table with them in the move, (I don't blame them!) I began spending hours and hours scouring craigslist and antique stores looking for a similar solution that just wasn't the typical countertop and base cabinet. But to find something in the right dimensions that preserved the style I was hoping to maintain was going to cost me thousands of dollars. (And when you're talking rental property, that's not where you want to throw thousands of dollars.)
Discouraged and without any decent options, I gave up looking and continued working on other aspects of the house.
 |
| Our workbench is about to get a makeover! |
It was during a trip out to the SHED of our house to gather some tools that I noticed this old table that served as our workbench.
It was the right dimensions (except it would need to be raised up to countertop height) and the right style, and with a little do-it-yourself project, this would become the TABLE!!!
Crazy how it had been sitting right in front of me all along.
First step: take off the legs.
These 4x4 fence posts happened to be laying in the yard, so with a chop of the saw they became the perfect, chunky table legs.
Now at countertop height!Next step: add a shelf underneath for some open storage.
 |
| Who says wood needs to match? |
Using some 2x4's and several pieces of old scrap wood laying around the house, we created this beautiful lower shelf, creating the look of rustic, reclaimed wood.
Now for the countertop. Ideally, I would have loved a true butcher block, but again, I wasn't willing to dish out hundreds of dollars.
I was going to try my hand at building a wood countertop myself by gluing and clamping planks of wood together, but when I found a stainable, solid spruce panel at a home improvement store for only $35, that made the decision a whole lot easier.
We sanded the top of the workbench, and put an entire tube of liquid nails on it.
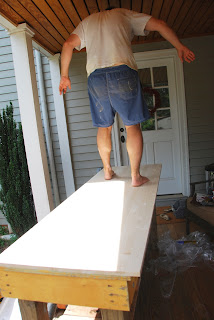
Then it needed ALL THIS WEIGHT to help it glue down.
(ha ha!)
 |
| our little contractor, with a pencil behind his ear |
Okay, so with only one clamp in our possession, we just piled everything we could find on top to help secure it down overnight.
Unfortunately, after a very humid night, the wood panel bowed up and needed further securing with screws from underneath to keep it laying flat.
 |
| finished product! |
And here it is sitting in the kitchen basement! (which we have since painted) For well under $100, we were able to design and create a truly unique kitchen island!
What do you think? Pretty cool transformation, eh?


That is so cool!
ReplyDeleteThanks, Dawn!!
Delete